Preparing the Surgical Field
The operation is performed with the patient in the supine position. Some surgeons prefer a modified lithotomy position using Allen universal stirrups to allow potential access to the vagina and closer proximity of a second assistant. A pelvic exam under anesthesia is routinely performed. This exam further delineates the existing pathology and may help with the selection of the type of incision. It also provides the examiner with immediate feedback on interpreting abnormal findings. The vagina and urethra should be prepped and a Foley catheter placed for straight drainage. A low transverse abdominal incision can be used if cancer is not suspected. This incision can be converted to a Maylard or Cherney incision if increased exposure is necessary. In cases of known or suspected malignancy, a vertical incision is preferred to allow increased exposure to the upper abdomen and improved visualization for appropriate biopsies and node dissection.
When the surgeon enters the peritoneal cavity, the upper abdomen is explored by visualization and palpation to identify any adhesions or masses. A systematic check includes the liver edge, gallbladder, stomach, omentum, small bowel, colon, kidneys, and paraaortic lymph node chain. Any adhesions are released to provide adequate exposure to the pelvic anatomy. The Trendelenburg position assists in maintaining the bowel out of the operative field.
The Balfour retractor is placed. Care should be taken that the ends of the blades do not rest heavily on the psoas muscle because the femoral and genitofemoral nerves can be compressed. The bowel is lifted out of the cul-de-sac with the operator's right hand. The left hand is then used to position the edge of an opened laparotomy pad under the suspended bowel. This laparotomy pad is then draped across the bowel, covering it from right to left gutters like an apron, with the remaining edge tucked under the anterior abdominal wall. A rolled laparotomy pad is then placed immediately laterally in each gutter and pushed directly cephalad to ensure that no bowel escapes down these lateral margins. An upper blade is attached to the Balfour to maintain this position. This blade should be flat and perpendicular to the abdominal wall and not allowed to rest on the aorta and vena cava. A wide, curved Deaver retractor is used to hold back the bladder. This can be held by an assistant and moved from right to left to assist with visualization on each side as the hysterectomy progresses.
The Round and Broad Ligaments
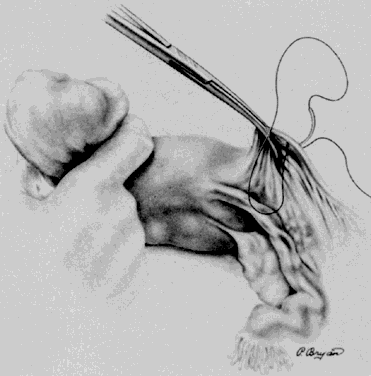
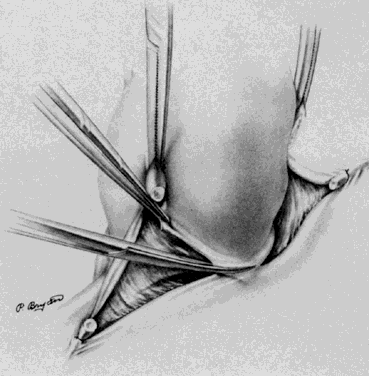
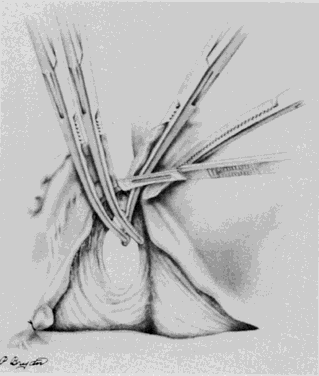
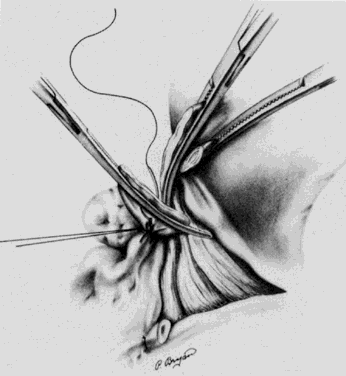
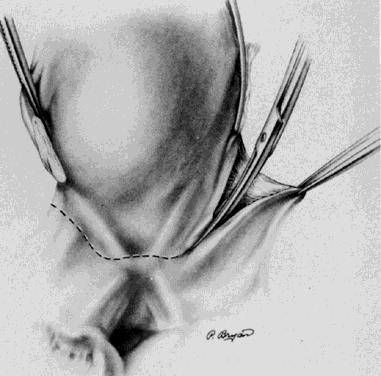
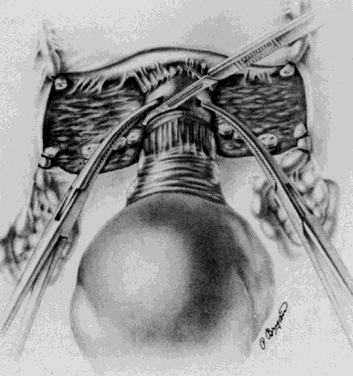
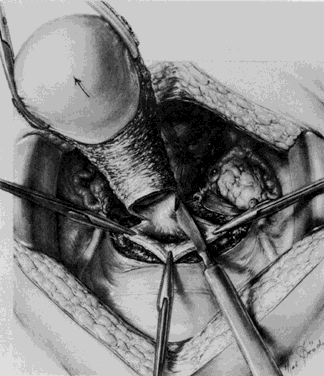
A Kelly clamp is placed immediately lateral to the uterus at each cornua and incorporates the isthmic portion of the fallopian tube and the utero-ovarian ligament within its grasp. Bilateral clamps in this position will allow for elevation, traction, and rotation of the uterus, which will aid in visualization and dissection. The round ligament is grasped with a Kocher clamp midway between the uterus and the internal inguinal ring. A transfixion suture of 2-0 delayed absorbable suture is placed through the distal portion of the round ligament and tagged (Fig. 1). A second suture and/or large hemoclip may be placed across the proximal portion of the round ligament to prevent back-bleeding. The round ligament is transsected and the anterior leaf of the broad ligament is incised toward the level of the internal cervical os with Metzenbaum scissors. This will begin the development of the bladder flap (Fig. 2). The posterior leaf of the broad ligament may also be incised parallel to the infundibulopelvic ligament toward the side wall. This exposure is particularly helpful if the ovaries are to be removed. With traction of the uterus away from the side wall and lifting the tagged, round ligament upward and lateral, the operator can separate the areolar tissue within the broad ligament by spreading the index and middle fingers in a scissorlike manner.
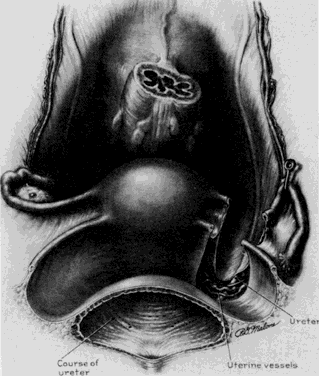
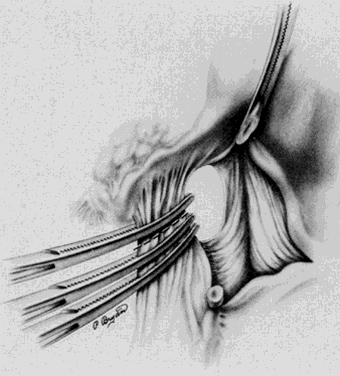
The ureter is visualized on the medial leaf of the broad ligament in this space. If adhesive disease impedes visualization here, the ureter can be identified at the pelvic brim where it crosses the iliac vessels at their bifurcation. The ureter can then be followed downward through its course to ensure that further dissection does not compromise its integrity (Fig. 3). The ureter appears as a white, nonpulsatile tubular structure with fine blood vessels noted longitudinally on the adventitia. It is best identified by visualization of its characteristic peristaltic activity. It can also be palpated by the operator's thumb being placed deep on the intraperitoneal side of the posterior medial leaf of the broad ligament and the index finger deep on the retroperitoneal side of this medial leaf. As the operator holds the index finger and thumb together with the peritoneum trapped between and moves upward, the ureter will be palpable and demonstrates a “rubber band—like” twang as released. This palpation can then guide the dissection to achieve adequate visualization.
The Ovary and Fallopian Tube
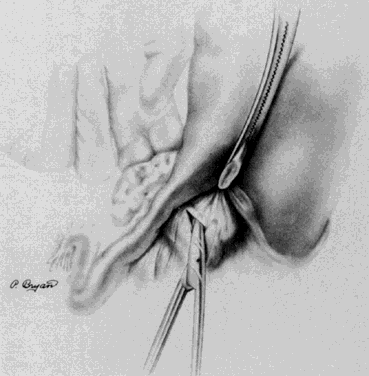
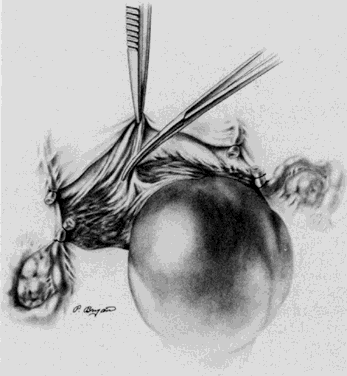
The avascular portion of the posterior broad ligament lateral to the uterus, anterior to the ureter, and posteromedial to the infundibulopelvic ligament is identified and tented upward with the index finger (Fig. 4). It can be bluntly or, if thickened, sharply entered. If the ovary and fallopian tube are not being removed, this window allows isolation of the proximal fallopian tube and utero-ovarian ligament. These structures are clamped with two Kelly clamps close to the uterus with care being taken that the lateral clamp does not impinge on the ovarian capsule. The Kelly clamp on the uterus can be replaced so that its tip extends into the window. The pedicle is cut, leaving two clamps laterally (Fig. 5). This allows the pedicle to be free tied as one clamp is released, then transfixion sutured around the second clamp (Fig. 6).
When the ovary and fallopian tube are to be removed, the window produced in the broad ligament serves to isolate the infundibulopelvic ligament, which is clamped with two Kelly clamps above the level of the ureter. The most distal clamp is placed first. A third clamp immediately adjacent to the ovary and fallopian tube prevents back-bleeding (Fig. 7). The ligament is cut above the two distal clamps. The distal end is free tied and then transfixion sutured with 2-0 delayed absorbable suture. The proximal end is also tied and may be suspended from the Kelly clamp on the uterus to prevent the ovary and tube from obstructing the operative field.
Developing the Bladder Flap
The bladder flap is further developed by lifting the anterior peritoneum and retracting the uterus cephalad to expose the bladder reflection and enter the vesicocervical space (Fig. 8). This space can be developed bluntly if there is no scarring from previous surgery or adhesive disease. Otherwise, sharp dissection in the midline is recommended. Excessive dissection in the anterolateral direction may disrupt the bladder pillars (vesicouterine ligaments) and cause unnecessary bleeding. Care should also be taken not to cut into the cervix when dissecting free the bladder, because this also creates extra bleeding. If the bladder is densely adherent to the cervix in the midline, the lateral areolar spaces can be developed approaching the midline to help define the appropriate plane between the bladder and cervix in prelude to sharp dissection. In the most difficult cases, a small cystotomy in the dome of the bladder can be made to allow the surgeon to insert a finger into the bladder and apply pressure to the bladder mucosa in the area being dissected. The dissection can then be accomplished with full awareness of the proximity of the bladder.
After the surgeon mobilizes the bladder inferiorly, the pelvic ureter is palpable through its course beneath the uterine artery lateral to the internal cervical os. Mobilization of the bladder is continued at intervals during the remainder of the hysterectomy to ensure that it is completely free from the base of each pedicle.
Uterine Vessels and Cardinal Ligaments
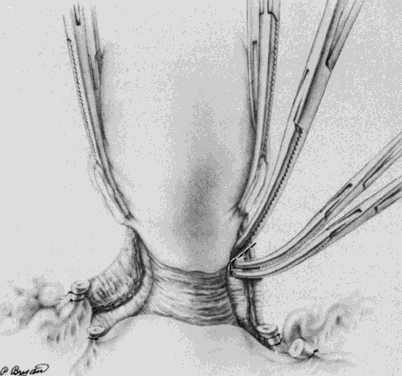
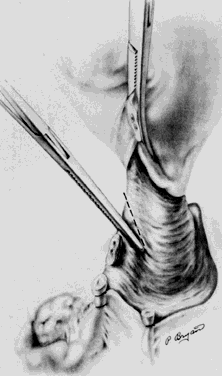
The uterine vessels are skeletonized by removing any overlying avascular areolar tissue and further incising the posterior peritoneum toward the internal cervical os (Fig. 9). Incision of the peritoneum over the posterior cervix between the uterosacral ligaments may be delayed until later to avoid extra bleeding. This peritoneum may require no further mobilization if the reflection of the rectum is below the lower margin of the cervix. The uterine vessels are triple clamped with curved Heaney clamps at the level of the internal cervical os (Fig. 10). The lowest clamp is placed first. The vessels are cut with Mayo scissors, leaving two clamps on the distal pedicle. This pedicle is ligated with a single suture, then a transfixion suture of 0 delayed absorbable suture. The cardinal ligament is then approached with a straight Heaney clamp placed medially to the previously ligated uterine vessels. The anterior portion of the clamp is placed on the cervix in the vesicocervical space and the posterior portion on the cervix medial to the uterosacral ligament (Fig. 11). As the clamp is closed, it is allowed to slide off the lateral surface of the cervix. Because the ureter is located approximately 2 cm lateral to the cervix within the cardinal ligament, this technique allows the minimal amount of lateral tissue to be incorporated into this pedicle and decreases potential pulling or kinking of the ureter as the pedicle is tied. The cardinal ligament pedicle is cut with the knife and transfixion sutured with 0 delayed absorbable suture. Depending on the length of the cervix, several progressive bites with the straight Heaney clamp down each side of the cervix may be required before reaching the level of the external cervical os. The uterosacral ligaments may be included with the cardinal ligament pedicles or taken separately with a curved Heaney approaching the cervix from the posterolateral direction (Fig. 12).
Cervix Removal and Cuff Closure
A closed technique for removing the cervix from the upper vagina is beneficial in decreasing spillage of vaginal contents into the abdomen. This technique decreases the risk of infection and the formation of symptomatic granulation tissue at the vaginal apex. The lower edge of the cervix is palpated by placing the operator's hand into the cul-de-sac with the palm facing the uterus, the index and middle fingers on the posterior cervix and vagina, and the thumb on the anterior cervix and vagina. Palpation and visualization in this area will ensure that the bladder and, if necessary, the rectum have been adequately mobilized. A curved Heaney is placed across the lateral vaginal apex with its tip extending across the upper vagina immediately beneath the cervix (Fig. 13). A similar placement on the other side allows the two Heaney clamps to meet in the midline. If the vagina is wide enough that the two clamps do not meet, then these pedicles can be cut and the procedure repeated across the remainder of the upper vagina. Statinsky scissors provide a right-angle cut that is ideal for transsecting these pedicles. Removal of the uterus is thus achieved. The pedicle within the curved Heaney clamp is then transfixion sutured with 0 delayed absorbable suture. The vaginal angle sutures are tagged. The anterior and posterior vaginal mucosa is trapped within the clamp by this technique and does not need to be identified separately. If, however, a clamp slips loose, the anterior and posterior vaginal mucosa must be identified and incorporated into the closure to prevent these edges from continuing to bleed into the vagina.
Reperitonealization is not necessary unless hemostasis of the peritoneal edge is a concern. New mesothelium arises from the subperitoneal connective tissue cells, not the adjacent peritoneal edge,3 and occurs simultaneously in all exposed areas independent of the size of the defect.4 A smooth, glistening surface is visualized within 5 days.3 Attempts to cover areas of peritoneal injury may lead to increased adhesion formation at the sites of reperitonealization by preventing autolysis of early fibrinous attachments5 and introducing reactive responses to suture material.6
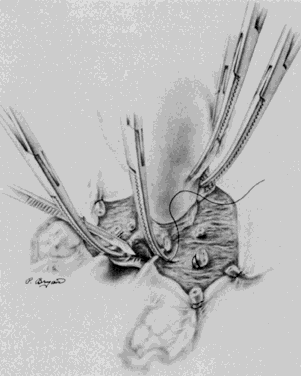
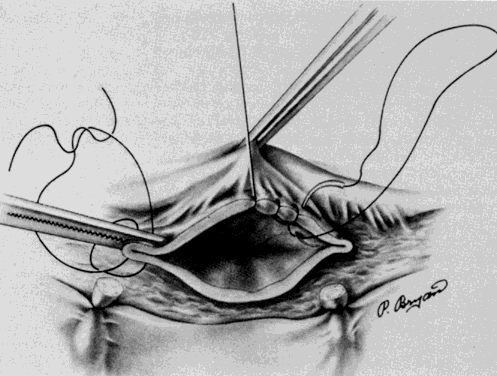
In cases where drainage of the pelvic cavity through the vagina is desired, such as surgical intervention for active pelvic inflammatory disease unresponsive to antibiotic therapy, an open vaginal cuff with a drain is appropriate. This technique involves identifying the anterior vagina in the midline. The full thickness of the vaginal wall is grasped and held with a long Allis clamp. The vagina above this clamp is entered sharply. One blade of the Mayo or Statinsky scissors is placed within the vagina immediately beneath the cervix. The vagina is circumferentially cut to completely remove the cervix and uterus. As the vagina is being cut, long Allis clamps are placed at both vaginal angles and on the anterior and posterior vaginal walls (Fig. 14). Angle sutures of 0 delayed absorbable suture are placed, incorporating the full thickness of the anterior vaginal wall, the adjacent cardinal ligament and uterosacral ligament, and the posterior vaginal wall. A suture of 0 delayed absorbable suture is placed from inside to out through the full thickness of the vagina beneath its cut edge, locked over the edge, and continued circumferentially around the top of the vagina for hemostasis (Fig. 15). A T-tube or Malincrot drain is placed through this open cuff with its end extending into the vagina. The anterior and posterior peritoneum are reapproximated with a continuous suture over the drain to maintain it in a retroperitoneal position.
Inspection and Assessment of the Cul-De-Sac
Meticulous attention should be directed to hemostasis. The abdomen is copiously irrigated and each pedicle inspected. The bladder is gently lifted and its base visualized. Cautery or excessive suturing at the bladder base should be avoided because subsequent necrosis could predispose to fistula formation. Any bleeding areas at the uterine vessels or cardinal ligament should be grasped with an Allis clamp and resutured within the suture line. Additional suturing outside this line requires re-evaluation of the proximity of the ureter. Intravenous indigo carmine coupled with a small cystotomy incision to visualize dye extrusion from both ureteral orifices will rule out a complete obstruction in difficult cases. The cystotomy incision also allows retrograde placement of a ureteral catheter to identify the presence and location of suspected occlusion. The catheter placement may be particularly helpful in diagnosing partial occlusion or kinking of the ureter, which would benefit from surgical release and may not be detected with the indigo carmine test.
Attention should be directed in each case to the prevention of pelvic relaxation. When the cul-de-sac is noted to be deep, uterosacral ligament plication can be performed as well as a Moschowitz procedure with two concentric purse-string sutures of medium silk below the level of the ureters. The Halban technique of approximating the anterior to the posterior peritoneum in the cul-de-sac or a zigzag from right to left pulling the anterior to the posterior peritoneum is an alternative in cases where a Moschowitz would cause undesired pulling or kinking of the ureters. Obliteration of the cul-de-sac is particularly useful when a retropubic urethral suspension such as the Marshall-Marchetti-Krantz (MMK) or Burch procedures is performed. These procedures, by their marked displacement of the anterior vaginal wall, predispose to future enterocele formation.
